Adding Materials to Inventory
How to add approved materials from Material Submittals to your project inventory.
- Click Add to Inventory in the toolbar
- Select from your project's Approved Materials list — name, spec, unit, and category auto-fill
- Set the Unit Rate (budgeted cost per unit)
- Optionally set Planned Quantity and Stock on Hand
- Click Add to Inventory — material appears with zero stock (or stock on hand value)
- Only materials approved through Material Submittals can be added
Full Guide
Why Only Approved Materials?
Traceability
Materials can only be added to inventory if they've been approved through the Material Submittals workflow. This ensures every material on your project:
- Has an approved specification and grade
- Has gone through your project's review process
- Is traceable back to the original submittal
- Can't be confused with unauthorized or out-of-spec materials
If you need to add a material that isn't in the approved list, submit it through Material Submittals first.
The Add to Inventory Dialog
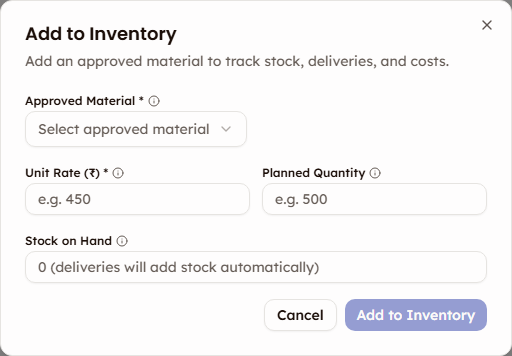
When you click Add to Inventory, the dialog shows your project's approved materials:
| Field | Source | Required |
|---|---|---|
| Approved Material | Dropdown of approved submittals (shows name, spec, manufacturer) | Yes |
| Category, Unit, Manufacturer, Suppliers | Auto-filled info section — appears after selecting a material | Auto |
| Unit Rate (₹) | You enter this — your budgeted cost per unit | Yes |
| Planned Quantity | Total quantity you expect to need for the project | No |
| Stock on Hand | Current quantity already on-site (pre-existing) | No |
When you select a material from the dropdown, an info section appears showing the category, unit, manufacturer, and approved suppliers — all pulled from the submittal. You don't need to enter these manually.
Setting Budget Rate and Planned Quantity
- Unit Rate — This is your budgeted cost per unit. It's used to calculate whether you're over or under budget as deliveries arrive. Set it to the rate you negotiated with your vendor or your project estimate.
- Planned Quantity — How much of this material you expect to use across the entire project. This drives the Consumed progress bar (usage ÷ planned quantity) and the low-stock alert (stock < 10% of planned quantity). You can update this later via Edit Budget.
Stock on Hand
If material is already on-site before you start tracking (e.g., leftover from a previous phase, materials procured before using PleoStack):
- Enter the quantity in Stock on Hand
- This immediately sets the material's current stock
- It's equivalent to a manual stock adjustment with reason "Pre-existing"
If you leave Stock on Hand at zero, stock will build up as deliveries are approved.
After Adding
Your material appears in the inventory table with:
- Zero stock (or the stock on hand value)
- No consumption (Consumed at 0%)
- Unit rate and planned quantity as set
Stock increases as you log and approve deliveries. It decreases as you log usage.
Alternative Path
When logging a delivery in the Deliveries tab, you can select an approved submittal that hasn't been added to inventory yet. The system automatically creates the inventory entry and links the delivery.
Related
- Stock Tracking — How stock levels are calculated
- Usage Logging — Recording material consumption
- Inventory Overview — Back to the full inventory guide